Earth Song Discovery Farm  


"Holistic Living in harmony with the Earth"
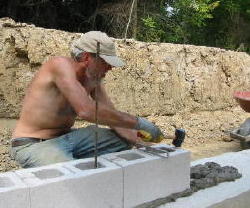
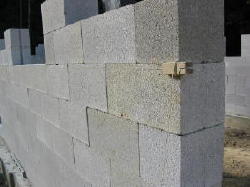
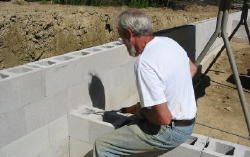
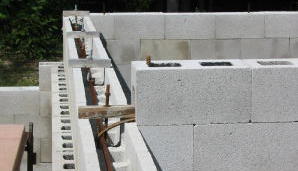
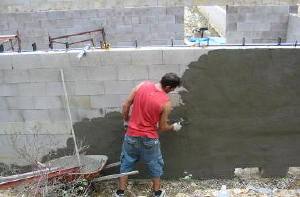
Home Page
Mission Statement
Farm & Gardens
Greenhouse
Eco-Center
General Store
C.S.A. Program
Herd Share
Well-Being
Spirit Art Project
Volunteers
Calendar
The Founders
Contact Info
Links/ Resources

Dry Stack Concrete Block Construction

Overview ....

     "Dry stack" refers to a building technique using concrete blocks with no mortar between them.

     The surface on both sides is coated with a special high strength cement creating a "sandwich" construction that is extremely strong, stronger than even the typical mortar joint.

     This building technique was developed by the military in the 1950's.

Details....

     The first row on the foundation is set in mortar and very accurately leveled, but with no mortar between the blocks.

     Then blocks are stacked to build the walls, all with no mortar (dry-stack). Check each course for level as you proceed. Since blocks can vary slightly, you may need an ocassional shim cut from aluminum flashing.


leveling first row with mortar
dry stacking block
dry stacking the blocks
  leveling the wall
leveling the wall

Bond Beam....

     First the cores are filled with sand or gravel. Some cores are left open to be filled with cement and rebar (those at corners, doorways, etc.) to add extra strength.

     Although not required, we chose to make our walls extra strong by placing vertical rebar in the block cores at 4 foot intervals.

bond beam at fifth course

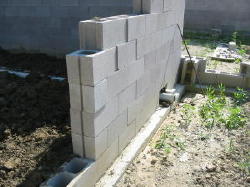
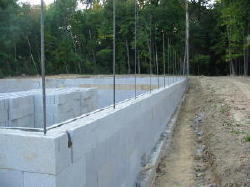
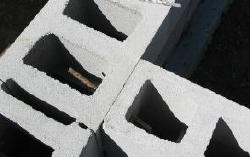
     The vertical steel rods are 5 courses high and are then tied into a horizontal band that runs completely around the building. This is called a "bond beam".

     The blocks on the fifth course are a special block that allows you to knock out part of the block so you can run rebar horizontally. Horizontal rebar is laid in these blocks and tied in with the vertical rebar coming up from the cores. Then concrete is poured in the cores and the entire row of blocks.

Anchors....

     Anywhere a wall comes out from another wall at 90 degrees, an anchor is put into place.

     This is made by drilling a hole into the joint and inserting a piece of rebar at an angle. The rebar is about 12" long and is exposed in the core of the block.

     This will be set in cement when the bond-beam is poured locking the two walls together and making the joint very strong. Vertical rebar is also set every 4 feet in the wet cement of the bond row so it will reach up to the final height of the wall.
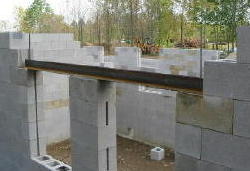
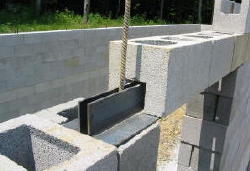
drilling for wall anchors
  detail of wall anchor
detail of wall anchor

Windows and Doorways....

     The rest of the wall is then stacked up to one row from the top. Where ever there is a window or doorway, two steel angle beams are placed across the top for support with notches cut out of the blocks to fit.

steel beams over windows
  beam detail
beam detail

Top Row....

     The top row is another "bond-beam" poured the same way as the fifth course. J-bolts are inserted in this final beam where each vertical rebar comes up. This creates "anchors" for tying into the roofing structure.

top level bond beam
top level bond beam

     When you are finished with this part, you have an extremely strong wall with a grid approximately 4 feet square of rebar reinforced wall.

     If in doubt, add another piece of rebar to lock things together, even bending some at the end of a run to tie the vertical to the horizontal. Rebar is cheap and adds a tremendous amount of strength. Concrete is great in compression, but has little strength in tension unless there is steel inside.

Surface Bond....

     "Surface-bond" cement is very smooth with small strands of fiberglass in it. This special cement covers the surface of both sides of all walls (about 1/8" thick), also filling in any cracks.

applying surface bond cement

Insulation?....

     There is no insulation on the outside wall of this particular structure. We are using an "umbrella insulation" on top of the ground and out 20 feet around the structure. (See the page for Passive Annual Heat Storage)


Advantages....

  • Stronger than conventional block and mortar construction technique.
  • Easy to stack and build by one or two persons.
  • Does not require skilled labor.
  • The filled cores hold daytime heat, keeping room temperature more even at night as heat is radiated back into the house.


Dis-Advantages....

  • Slight imperfections in blocks sometimes cause gaps or need shims or trimmed to fit.
  • Precautions need to be taken while building until the cement is poured, as the blocks may move. (We found out the hard way, leaning a ladder against a short section of wall and toppling it over!)
  • Walls exposed to wind should never be built very high without either bracing or additional bond beams to lock it together. We would not recomend building more than one story high.
  • This is hard, labor intensive work. We estimate we have put into place well over 100,000 pounds of block and cement, all of it mixed in a small cement mixer and placed into the cores with small hand scoops. Only the footers were placed utilizing premixed concrete in trucks.


Home Page   |   Mission Statement   |   Farm & Gardens   |   Greenhouse   |   Eco-Center
General Store   |   C.S.A.   |    Herd Share    |   Well-Being   |   Spiritual Art Project
Volunteers   |   Calendar   |   Founders   |   Contact   |   Links/ Resources